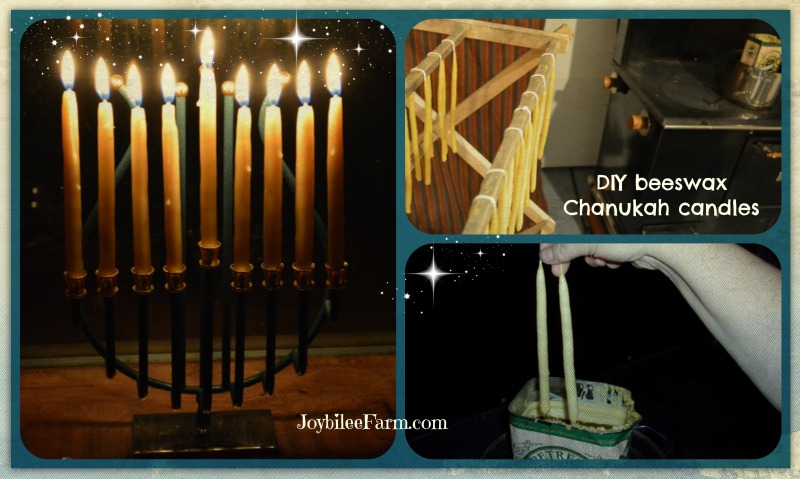
Make these simple, hand dipped beeswax candles for your holiday celebrations. These are perfect as hanukkah candles, for use in candle-based Christmas decorations, and with slight adjustment for birthdays, and other occasions that need thinner than average candles.
Bees wax candles fill your home with clean, honey sweetness. Hanukkah, the Feast of Dedication that celebrates the Maccabean victory in 165 BCE over the Greek despot, Antiochus Epiphanies in Jerusalem and the miracle of the menorah in the Temple. To observe the modern Hanukkah celebration of 8 days, requires the burning of 44 candles in the Hanukkah menorah over the 8 day festival. While burning paraffin candles or soy candles adds toxins to the air, burning bees wax candles cleans the inside air of your home and adds uplifting negative ions.

Hanukkah candles are fairly inexpensive, ranging from $5 for cheap paraffin candles to $15 for rolled bees wax candles. You won’t save money by dipping your own candles. But hand dipping your own beeswax candles, will give you a more healthful, longer burning candle than the commercially available alternatives. Beeswax Hanukkah candles are drip-less, and burn for about 1 1/2 hours.
Hand dipping candles is a fun, family project that gives you an opportunity to spend meaningful time with your children or grandchildren. It’s a useful skill to add to your repertoire of homestead skills, too. The smell of melting beeswax is uplifting and refreshing to your spirit, too. Are you ready to make some happy memories?
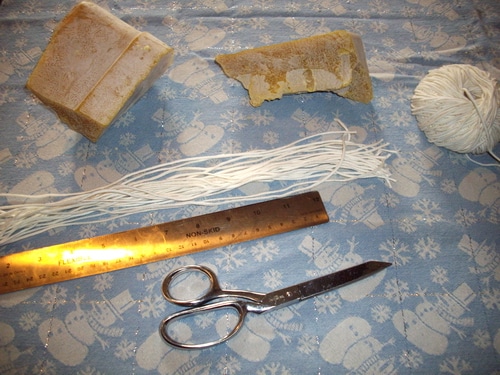
What you need to make hand-dipped beeswax candles:
You’re going to use 15 grams or about ½ an ounce of beeswax per candle and you’ll need, 26 feet (8.5 yds.) of wick and 1.5 lbs of bees wax to make a set of 44 Hanukkah candles. But you’ll actually need 2 to 3 lbs. of bees wax to make them.
You can buy bees wax from your local bee keeper for about $5 a lb. or buy it on Amazon for $10 per lb. Left over wax can be used to make poured candles, cosmetics, moisturizers, and salves. If you have a local source, buy extra bees wax and keep it on hand for your DIY projects. Natural beeswax is the foundation for many beautiful gifts.
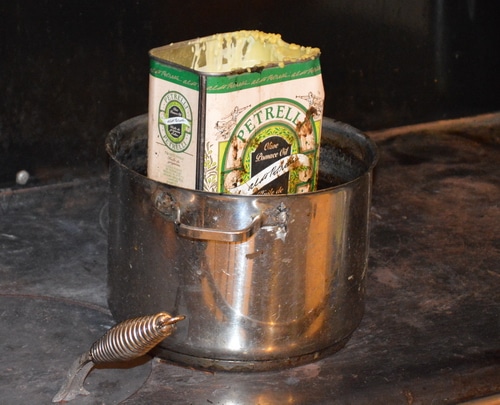
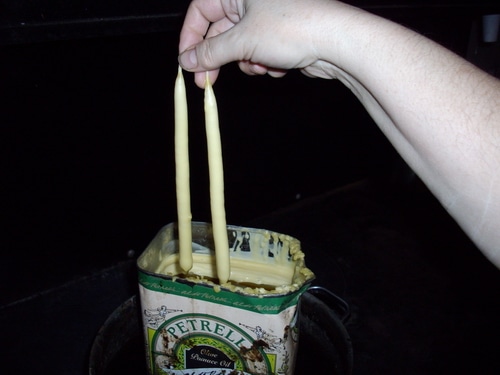
You will melt the beeswax in a can, placed in a dedicated pot with water – I used an old 3 litre olive oil can, as its rectangular shape takes a 3 lb block of beeswax perfectly. That’s the size of bees wax that I buy from my local bee farmer. A round 3 lb coffee can would work well, too. A 3 lb. block of bees wax will give you ample wax for this project with leftover wax for another application. (Note: Once you melt bees wax in the pot, you won’t want to use it for anything else. Bees wax is hard to clean out of the pot. It doesn’t harm the subsequent uses of the pot, per-say, but it’s pretty messy. Never pour waxy water down the drain! It will cool and plug your sink.)
Ew, there’s bug bits in my wax!
When buying beeswax from your local farmer there may be bee body parts in the wax – legs, wings, etc. Don’t worry about it. As you melt the wax the junk bits will settle on the bottom of your melting pot, leaving you clean wax to dip in. If you buy filtered, refined beeswax, you’ll avoid the bee parts, but you’ll also be removing the pollen and the sweet honey scent and warm, yellow to brown colour of natural bees wax. The more natural state that you get your wax, the nicer the natural fragrance, and the lower price. Good quality natural bees wax doesn’t need chemical fragrance to disguise it’s scent.
Since these candles are burned in one sitting, there is no reason to worry about the cleanliness of the wax in relation to clogged wicks. Candles burned in one sitting do not need quite as pure a wax as candles that will be snuffed out and re-lit. On multi-use candles, any dirt in the wax can clog the wick, making it impossible to relight after the first use.
Preparing the wicks and beeswax for hand-dipping
Here’s a step by step guide to hand dipping your own bees wax hanukkah candles.
- Cut wicks 14 inches long for a 6 inch candle – you’ll need 22 wicks
- Melt natural bees wax in a can set inside an old pot that you are willing to sacrifice to candle making. The can should be at least 7 inches high and be at least 6 inches across.
- Use an old sheet, table cloth, or tarp to protect your floor. Bees wax drips are a pain to clean up and this makes it easier. Use something that you don’t mind soiling with wax drippings. Wax won’t wash out of the cloth.
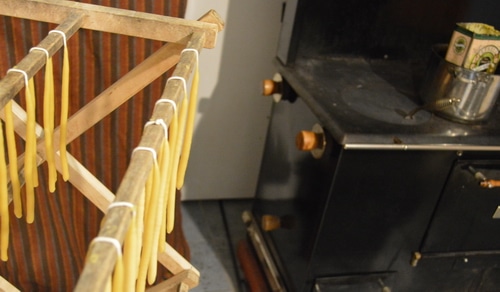
- Clothes drying rack set up over old sheet to protect the floor.
- Melt 50% more wax than you think you need. You need this for the depth of the candle wax in the can, to make sure that you have enough depth of wax, to dip into, for all 44 candles. 2 ½ to 3 lbs is a good goal.
Caution: Never let your wax smoke. This can cause a spontaneous fire. Never melt wax unattended. And never melt wax directly on a heat source – always use the double boiler method — or a can inside a pot of water.
To dip the beeswax candles
This makes 44 – 6 inch Hanukkah candles. Hanukkah candles are narrower than table (Sabbath) candles, so you won’t have to dip very often. If you have a Hanukkah menorah, have it handy so you can test the base of the candles in the candle holders of your menorah.
How often you have to dip, depends on the temperature of the wax. Hotter wax remelts the wax that has already been layered on the wicks. Cooler wax puddles on the candle and layers up faster, but the quality of the candles isn’t as good. The perfect temperature will lay down an even layer of wax with each dipping but not over coat the wick with unbound wax.
- Fold your wicks in half
- Dip up to ½ inch from the fold in the wick. Lift the wick from the wax and hold it over the melted wax, allowing the wax to drip back into the melting pot.
- Dip two and three times repeating the dip — lift – drip; dip — lift – drip; On the third dip and lift, allow the wax to drip back in and remove the wicks from the pot. Hang them over the rack to cool.
- Be sure to cover your floor and work area with an old sheet or tarp to catch the spills. Wax is horrible to clean up off the floor or counter – it’s doable with an icecube and a dull knife or scraper, but I’m sure you’d rather avoid the ordeal.
- Continue dipping the remaining wicks. In this first part I often dip a multiple of wicks at a time. But in the subsequent dippings, I’ll do them one pair at a time. When dipping your wicks, be sure to separate them on the rack before allowing them to harden. You’ll straighten them before dipping a second time.
- Hang the wicks over your drying rack as in the picture.
How to keep hand dipped candles straight
Before each dipping grab the bottom of the wick and straighten the wick-candle, before the next dipping. Do this to each candle in a pair, before you dip it and your candles will be relatively straight.
When the candles have been dipped 3 or 4 times and have cooled so that the wax is hard, but the candles are still warm to the touch, I roll them, with my hands, on the wooden surface of my dining room table, to make them uniformly straight. And then continue dipping about twice more.
Each candle received about 7 dips with 3 actual dips in the pot each of the 7 times. Your mileage may vary, depending on how hot your wax is, and how warm your home is. Hotter wax remelts the laid down wax on the candle and puts thinner layers of wax on the candle in each dipping.
To finish your candles
- Allow the candles to cool completely and harden.
- Take a lint free cloth, a linen napkin is perfect for this but a cotton one will work, too. Avoid polyester, as it will stain from the wax.
- Polish the candles by rubbing them up and down with the linen cloth until they shine. The friction of the rubbing melts the wax just a bit and brings out the luster.
- Cut the pairs of candles apart and trim the wicks until they are no more than ¼ inch long.
How to use your Hanukkah Candles
Place in your Hanukkah menorah in the traditional way and you light them according to your family tradition.
If this is your first year lighting the Chanukah menorah, see this explanation of how to use the Chanukah menorah to remember the story of the Maccabean victory over the Selucids.
Other hand dipped candle variations
To make 10 inch Sabbath candles, follow these same directions but make the wicks 22 inches long and dip more times till the candles are thick enough at the base to fit your candle holders. See further directions here.
To make 3 to 4 inch birthday candles, simply shorten the wicks to 10 inches long and proceed with the directions as given. You will only need to dip about 5 times to get birthday candles of the correct thickness. (5 x 3 dips, with a cooling period after each 3 dip routine, as described above.)
The Hanukkah menorah candles are the same size and thickness as the Scandinavian Christmas angel-bell windmill candles. Make your own candles for the angel-bell windmill ornament following the directions for the Hanukkah menorah hand-dipped beeswax candles. Use your candle holder as the guide for when to stop.
Other candle making tutorials on Joybilee Farm:
Beeswax luminaries to help avoid plastic luminaries that will end up in the landfill. When you’re done with the beeswax luminaries, simply re melt them down and use the wax for another project.
Making candle wicking if you can’t find the right wick for your candles, or simply want to experiment. This will help you level up your candle game.
Be inspired with more beeswax recipes from my book The Beeswax Workshop:
Beeswax is easy to work with and a versatile ingredients for DIY Perfumes, salves, and personal care products. It’s not just for candles, even though DIY candles are wonderful, too. Grab my book The Beeswax Workshop, and learn more about this amazing ingredient.




I used a #2/0
Wicks come in several sizes and materials. What size wick do you recommend?