5 Photography Tips for Homestead Bloggers
Photography tips for getting the most from your digital camera so that your photos will gain attention and help build your business.
I’ve been working hard on my photography skills this year. Because, frankly, my photography sucked. When I started this blog I had a point-and-shoot digital camera. The year was 2005. Blogs were in their infancy. There weren’t many digital photography tips online. And frankly, I didn’t know to search for any.
Digital cameras left a lot to be desired back then. Indoor pictures with the flash were hideous. Outdoor pictures were just mediocre. The smartphone cameras of today are a million times better than that little Pentax digital point and shoot. It eventually just cracked so I had to replace it.
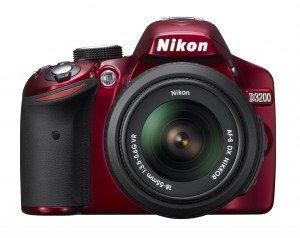
In 2013 my photos had a big improvement. I got my first DSLR camera, a Nikon 3200 with a kit lens. Now I confess that I picked that particular camera because it was red. I thought I wouldn’t lose it because it would stand out. (don’t laugh!)
I did check a few reviews to make sure that it wasn’t a bad choice. But I really didn’t know enough about DSLR cameras to know whether Canon or Nikon was better. And I figured that once I made a choice I’d kind of be stuck with that choice, since buying lenses for a DSLR camera is a costly venture. My friend, Pat Kelly, the local reporter used a Nikon 3200 DSLR Camera with the kit lens. His was a black one. I figured that if it was Pat’s choice, it would be good for me, too. And if I had a problem with it, I could ask Pat.
So here we are 2 years later and I find myself really happy with my choice of Nikon over Canon. I have no problem with Canon per se. But, well, I still love the red camera body. As far as the workings of the camera, I’ve had no problem at all. The camera always works when I want it to. My pictures are better than they were — especially using natural light.
In low light situations though my pictures still sucked, more often than not. It was time to add a lens.
Some considerations when choosing a Nikon Lens
The 3200D camera body (and the Nikon 5000D series) has no motor. So when you are ready for an additional Nikon lens your choices are restricted to AF-S lenses that have a motor built into the lens. Without the motor, the self-focusing ability of the lens is greatly compromised. Even with the motor, you can manually focus the lens, too.
This week I added a fixed lens — the Nikon 50mm f/1.8G AF-S NIKKOR Lens to my camera. The 50mm lens was recommended to me in the food photography book, Tasty Food Photography from Pinch of Yum. I took it out for a test drive on Saturday afternoon. The verdict: I love working with this lens.
- Using a fixed lens gives me more time to think about composition.
- It lets in way more light than the kit lens.
- Using it has made me more aware of the way the light plays in the picture
- It’s made me excited about improving my photography
5 tips for improving your digital photography for your blog or homestead biz
Here are a few tips I’ve gleaned so far on my journey that I hope will help you — especially if you are a homestead blogger or have a homestead business that requires excellent pictures for promotional materials.
Tip #1 Invest in the equipment necessary to make your pictures shine
My camera and my lenses, the books, the courses, the photo apps, and the programs like Canva and Pic Monkey are investments to make your homestead blog sparkle and shine. Without the right tools, you can’t possibly do the job that you need to do to make your blog or your homestead business stand out on the busy information highway. Which brings me to….
Tip #2 Invest in courses to improve your skills as a photographer.
Today it isn’t enough to be able to write a blog post or a press release for your homestead business. You also need eye-catching photos to get the attention you deserve. You might be able to hire a professional photographer, but that’s not doable every week. And so much of your homestead success depends on being able to communicate your story and your passion.
It took me a while to get this. At first, I thought if I just wrote about what interested me, and took a quick picture to illustrate a point, it would be enough. But I found that I was getting left behind. While my homestead blogger friends were getting lots of repins on Pinterest and seeing lots of traffic, well, I wasn’t seeing as much success. And frankly, (I’m being honest here. No hate mail, please), my pictures were dark and impoverished. They weren’t an adequate reflection of my true homestead life. That needed to change.
First I invested in the Ultimate Digital Photography Bundle and read the Tasty Food Photography Book. I saw the potential of what my pictures could look like if I just spent the time to improve my skills. The price of the bundle was so much less than my investment in equipment. And what’s the point of having equipment that I didn’t know how to use well? Seriously! How could I say, NO? The price was right, too.
Then I invested in the Craftsy Course, Food Photography from Plate to Photo with Andrew Scrivani
The class has 7 modules that take you from the basics of light and equipment to staging and props. There are challenges in a class situation where you can upload your own photos and get input from the professional photographer – instructor and other students. It’s a fun class and I’m glad I signed up. I’m learning lots. (Disclaimer: I’m a Craftsy affiliate. I bought the class.) (Note: If you purchase the Ultimate Digital Photography Bundle — Intermediate or Pro Edition there is a Craftsy photography course included in the Bundle).
I also joined a food photography tip group (free) on Facebook. Although I’ve been too shy to submit any of my own photos for critique, I’m picking up some amazing tips by lurking. Especially the staging tips to get just the right moody hero shots for my own recipes.
Tip #3 Don’t be afraid to fail — take 100 shots at different settings and angles
The first day I took my new lens for a test drive I took 1o0 shots just to see what the lens could do. I wanted to get comfortable with its capabilities. I wanted to see what its shortcomings were.
Yes, it has shortcomings. Or at least I have shortcomings that were emphasized with this lens. It has no anti-shake mechanism, so I need to have a steady hand or a high shutter speed. The kit lens does have the antishake capacity, so it won’t be retired yet.
On Saturday I took the lens outside and today, Sunday, I brought the lens into the low light of the kitchen to photograph a butternut squash spice cake, in the process. (recipe coming on Wednesday). It allowed a lot of light in. Almost too much light. I’ll need to work with it more to learn how to use it better indoors, with food.
That’s one advantage of the Craftsy course. I’m not on my own to learn this new skillset.
Tip #4 Try taking the shot with the light coming from the side, instead of behind the object or in front of the object
Have you noticed how outdoor pictures are so magical when taken an hour before sunset or an hour after sunrise? That side-lit angle gives depth and definition to the photograph that is missing when the light is directly overhead.
You can take advantage of that indoors by setting up the shot beside a window and instead of facing the window, take the picture with the window to your right side or left side. Turn off the camera flash, and use the ambient light.
You can further direct the light using a white sheet to bounce light back onto your object. If there is too much light, you can use a blackboard to absorb some of it and create shadows and definitions. Experiment and enjoy the process.
I picked up this tip from the Craftsy Course, Food Photography from Plate to Photo with Andrew Scrivani. It’s in module 1.
Tip #5 Have fun and give yourself time to improve
It takes time to learn new skills. As you practice new neuro-pathways are growing in your brain. If you keep on practicing, it will become second nature, eventually. Like learning to play a musical instrument, learning to see with new eyes takes time. But it will be worth it.
Just like it will be worth it for me to do the work and replace all those old photos with new ones, with my improving photography skills. There are almost 600 posts on this blog. It will take some time to replace the photos in all of them with new hero shots. But I’m telling myself it will be worth it.
A few more tips I’ve picked up along the way
See this post about photographing livestock and this post about photographing products.
Bonus Tip
If you are also a homestead blogger, like me, take both vertical and horizontal shots. And have the post title or keyword on at least one vertical and one horizontal shot in each post. Pinterest pinners favour vertical shots, while Facebook sharers favour horizontal shots. Who knew!
Limited Time Offer — Monday and Tuesday only
The Ultimate Digital Photography Bundle is on sale for just 48 hours from Monday, October 5th to Tuesday, October 6th. Then it’s gone forever. It’s a small investment for the joy and satisfaction you’ll get from taking those stunning shots that you have in your mind. And actually getting them up on your blog. Take your photos from good to great with a little help from the Ultimate Digital Photography Bundle, a Craftsy Photography Course, and join the Facebook group, too. The Facebook group is not related to the Ultimate Digital Photography Bundle and you can join it at any time.
And when you’re ready for a new camera or a new lens, let me know which one YOU picked. Are you a Canon or a Nikon fan?






Great photos! I only use my phone and roadeavour lens in my case!