Making ink from natural dyes for stamp pads, and fountain pens
Do not do this if you are allergic to walnuts! If you are nonallergic carry on.
Why make your own ink?
Many of the colourful inks that you can buy are made from fiber reactive dyes rather than the traditional pigments historically used in inks. Fiber reactive dyes, while permanent on cotton or paper, are highly toxic in the environment and are a carcinogen. They contain heavy metals and its almost impossible to use any ink in a pen without getting it on your skin.
One company continues to make fountain pen inks from natural dyes and pigments, J. Herbin, but like all companies of long standing provenance it may only be a matter of time before their products are no longer available. Their ink comes in a 30 ml (1 fluid ounce) glass bottle at $10 to $20 per ounce on Amazon. The company has been in the business of making ink from natural dyes for over 100 years, and their natural dye inks are imported from France.

Making your own ink, removes the toxic health risks of exposing yourself to fiber reactive dyes in commercial ink, as well as allowing you complete control over the manufacture and availability of your product. So start collecting your glass bottles and jars to hold your inks now. Those brown essential oil bottles, that were too good to toss when you used up the essential oil, make great bottles to store your home made inks.
Then there is Peak Oil and our desire to source what we need in our own community. And the threat of climate change that makes learning the skills to create our own inks essential for future generations. So lets look at this ancient skill and see how to effectively turn a garden waste product into a valuable resource.
In my last article I showed you step by step how to make your own walnut ink using the hulls from walnuts that are growing in your community. The recipe is a historic one that contains the dye liquor from walnut hulls, the green, fleshy husk that wraps around the hard brown walnut shell, as well as iron to darken the ink with a chemical reaction between the tannic acid in the walnut hulls and iron, plus gum arabic orgum tragacanth as a thickener, and isopropyl alcohol as a preservative. See the recipe here. If you are a homeschooler, check out this thorough discussion and lesson plan on making monastic ink from oak galls, that includes the chemical reaction diagrams.
In my experiments I’ve learned that walnut ink for calligraphy or painting is a different consistency from walnut ink for stamping and walnut ink for fountain pens. The main difference is the consistency of the ink because of the addition of the gum.

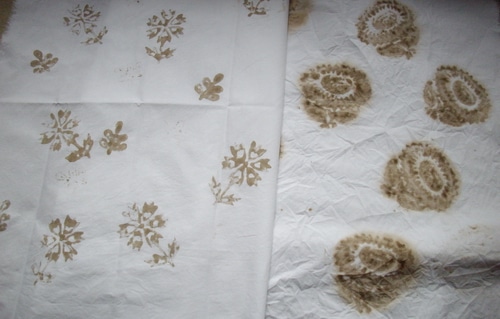
Wet printed cotton fabric on the right. Dry printed cotton fabric on the left.
Walnut ink for fabric printing
Walnut ink for printing needs to be viscose enough so that it doesn’t drip when applied to the stamp. It needs to be smooth and consistent so that it leaves a clear impression without blobs of ink. Walnut ink for printing is permanent after 48 hours and can be washed in water without fading. The impression is clearer when stamped on dry fabric but the dye penetrates better when stamped on wet fabric. No previous preparation of the fabric is necessary before stamping except to scour it thoroughly in preparation for dyeing. If you want an under colour to the fabric before printing, do that part of the dye process first. A weaker walnut dye on the base of the fabric before printing with your concentrated printing ink, makes a lovely golden brown fabric.
Walnut Ink for quill pens or other dipping pens
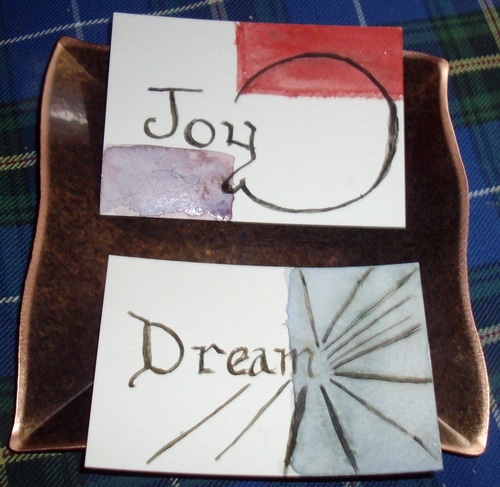
Dipping ink, such as you would use for calligraphy with a dip pen or a quill pen is less viscose than printing ink but still viscose enough to avoid dripping from the nib of the pen. This is the ink recipe that I gave you in my last article. The addition of gum to the concentrated walnut liquor makes the ink slightly less water proof.

When I did a water colour wash over my calligraphy done in the walnut ink, the wash dissolved the finer letters, while leaving the darker, bolder lettering. Consider applying any watery washes to your calligraphy paper or water colour paper first, allow this to dry before applying your lettering in walnut ink. The walnut ink can also be diluted with water and used as a foundation wash.
Walnut Ink for Fountain Pens
The ink used for quill pens or other dipping pens doesn’t work in a fountain pen. The gum used to thicken the ink for dipping makes the ink too thick to flow through the small capillary holes in a fountain pen. Further, ink for fountain pens needs to be very dark and quite liquid to allow it to flow from the reservoir of the pen into the nib freely but without blobbing.
Fountain pen ink needs to be reduced by 2/3rds to make it dark enough for good lettering, since no gum is added to increase viscosity and allow it to sit on the top of your page. Many artisan natural dye inks available for sale have gum added and should not be used in a fountain pen. You will gum up your pen and plug the flow, possibly irrevocably. Never use India Ink in a fountain pen. India ink contains shellac and it will harden permanently in your pen, plugging the flow, and ruining the pen.
So if you wish to use your walnut ink in a fountain pen, you will want a darker, more concentrated ink to begin with. Reduce the strained walnut dye liquor by 2/3rds — 2 cups of walnut liquor will be reduced to 2/3rds to 1/2 cup. Don’t let it burn. Add your iron at the beginning of the reduction and by the time it has simmered down it will be dark. Strain again.
Add 1 tsp. 99% isopropyl alchohol as a preservative and bottle for use. Test it with your fountain pen for flow and only add a touch of gum if it seems too liquid. In this case it is better to prepare the gum separately 1 tsp. per cup of hot water, allow to sit over night, and then add this by the tsp. to your prepared ink until you get good flow for your fountain pen. Too much gum will plug the flow of your pen, although the gum is soluble in water and so can be washed out.
Walnut ink for your stamp pad:
In the last article I also talked about using walnut ink for your stamp pad.
How to refresh an dry stamp pad
First you can refresh an old stamp pad by putting1 tsp. of glycerine onto the stamp pad and spreading it around as it soaks in.
This will revive the original colour and allow you to keep using it. If you want to use your walnut ink to ink a new pad simply use this greatly reduced ink that you made for you fountain pen and add 1 tbsp of glycerine to 1 tbsp. of prepared ink and brush it onto the stamp pad. The ink needs to be quite dark in order to get a suitable impression as the addition of glycerine greatly lightens the colour.
Walnut Ink as a valuable homemade gift:
Walnut ink is a valuable product that you can make at home using the green or blackened hulls from English or Persian walnuts, black walnuts, butternuts, or heart nuts. While some sources suggest that black walnuts give the best results, use what you have in your own community. What could be better for the young artist on your gift list than a bottle of homemade walnut ink and a quill pen made from your own turkey, duck or goose feathers? Add to it a book of calligraphy letters such as Margaret Sheppard’s Learn Calligraphy: The complete book of lettering and design
You may also be interested in these natural dye articles:
How to Grow a Natural Dye Garden
Medicinal Herbs that you can also use for Natural Dye


