

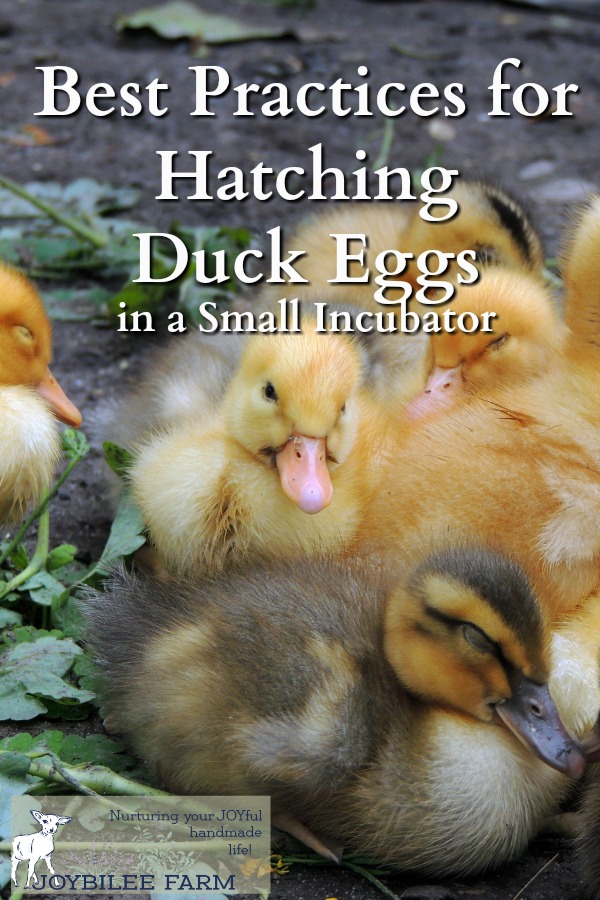
Hatching duck eggs and raising ducklings are a little more challenging than hatching chicken eggs. These best practices will improve your hatch rates.
Hatching duck eggs and raising ducklings is a very satisfying way to build up your homestead livestock. Ducklings will bond with you. They will follow you around the homestead. They have a cocky way of tilting their heads and looking at you with only one eye, which is very cute and endearing. Male ducks do not get as aggressive as chickens, fighting among each other. Domestic male ducks do not generally act aggressively toward people. Ducks also do less damage to gardens than chickens, while egg-laying breeds, like runner ducks, can compete with chickens for their egg-laying abilities.
At Joybilee Farm we hatch both chicks and ducklings using two Hova-Bator circulated air incubators – one for incubating the eggs and one for hatching the eggs. While most of the best practices that I’m sharing apply to hatching duck eggs in any small table-top incubator, some are specific to the Hova-Bator forced-air incubators.
I’ve also used a school model incubator with a built-in wet-bulb thermometer, and dial precision temperature control. While this model gave more control over temperature and humidity, it was limited to 12 chicken eggs and was too small to adequately incubate large duck eggs. It was built for classroom use, not home or hobby farm use. Constructed of hard plastic, it is more expensive to purchase. The Hova-Bator circulated air incubator is the best model for home or hobby farm use, where only a small number of chicks or ducklings are required each year. Projects that need a continuous hatch of chicks or ducklings should look beyond the available tabletop incubator models to a dedicated full-size Sportsman incubator and hatcher.
Incubating duck eggs in the Hova-Bator incubator
The Hova-Bator incubator is an entry-level incubator for homestead and hobby-farm use. Incubating eggs is a fun homeschool project, and the Hova-Bator incubator makes it easy and affordable. We purchased our first Hova-Bator 18 years ago for a homeschool science project. Hatching baby chicks is a “gateway drug” to homesteading, so be warned. One incubator for both incubating and hatching wasn’t ideal, so we bought a second Hova-Bator five years later so that we could incubate in one and hatch in the other.
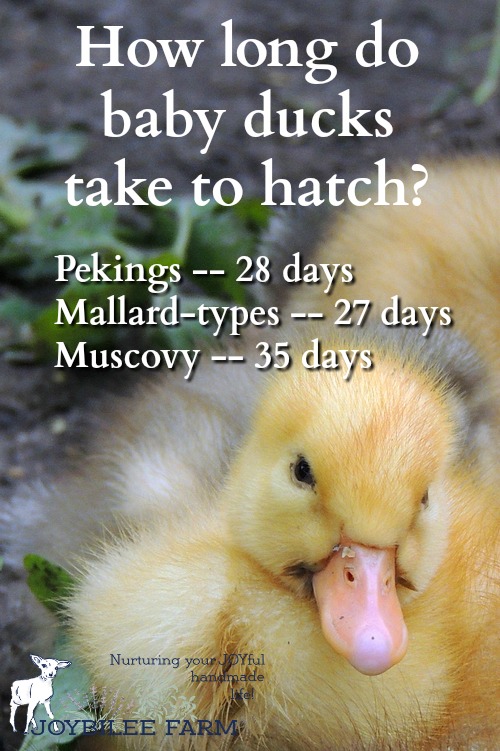
While baby chicks hatch in 19 to 21 days – bantam chickens hatch sooner – duck eggs take a bit longer, 26 to 28 days for mallard types and 33 to 38 days for muscovies. With the more extended incubation period that ducks require, they have a few more challenges to get a good hatch. I hope my experience using the Hova-Bator to hatch duck eggs will help you improve your hatch rates, too.
Keep your incubator clean and sanitary
The Hova-Bator incubator is made of Styrofoam. Styrofoam is difficult to clean after the hatch is finished. You can’t bleach it or put any strong chemicals or essential oils on it, without damaging the incubator, so sanitation is essential from the very start.
The longer incubation period for duck eggs means that there is more time for bacterial bloom in the warm humid environment. Clean your incubator immediately after use, and then before you use it in a new season to ensure good sanitation for your hatch. Be sure to use a mild soap with hot tap water. Stronger cleaning solutions can damage the styrofoam.
I have the forced air model of the Hova-Bator. I bought the automatic turning rack, and plastic water tray inserts to make cleaning easier. The plastic water try can handle more potent cleaning solutions that would dissolve the Styrofoam. There is an optional extender ring for the incubator that raises the heating element above the eggs, to use when hatching larger eggs, such as turkey, duck, or goose eggs. There is also smaller egg turning racks for quail eggs.
This model includes the plastic liner.
Turning the eggs
Don’t use the automatic turning rack when hatching duck eggs
The incubator that I use for incubation has an automatic turning rack. The automatic turning rack only rocks the eggs back and forth and doesn’t actually turn them over. This works well for chicken eggs, but not so well for duck eggs. The eggs are put in the rack with the air pocket upward. This puts the chicks in the correct position for breathing and later for hatching. This works well for chickens, but my larger duck eggs were too close to the heating element. The extender ring solves this problem by raising the heating element further from the eggs. However, with a full incubator, the top of the eggs, closest to the heating element were 5*F cooler than the bottom of the eggs. Again this isn’t a problem for chicken eggs, but with duck eggs, it lowered the hatch rate significantly.
Hand turning duck eggs
Instead of using the automatic turning rack with my duck eggs, I got better hatch rates by turning the eggs by hand. The eggs lie on their sides in the incubator and the opening of the incubator cools the eggs slightly while the eggs are turned three times a day. So that I could remember which eggs had been turned each time, I put an “x” on one side of the egg and an “o” on the other. It is advantageous for duck eggs to be cooled briefly each day, so this hand turning actually accomplishes two goals – turning the eggs and cooling them. The cooling period should be no more than 10 minutes in total each 24 hour period.
Check your humidity regularly
The humidity in the incubator needs to be a bit higher for hatching duck eggs than for hatching chicken eggs. But with the higher humidity also comes higher bacterial bloom. Add to that the long incubation period necessary for duck eggs and you run the risk of a weak hatch.
The incubation period of various duck breeds
Mallard and their derivatives generally have a 26 to 29 day incubation period. Muscovies require approximately a week longer to hatch or 33 to 35 days. High temperatures during storage or incubation cause premature hatches, while long storage periods of low incubation temperatures result in late hatches.
How to manage temperature fluctuations during the incubation period.
With ducks that critical time in the incubation period is the first 5 days and the last 5 days. If there is a power outage during the incubation period – after the first 7 days but before the last 5 days, the hatch can usually be preserved by covering the incubator with a wool blanket to preserve the heat inside the incubator. Remove the blanket as soon as the power comes back on, to prevent overheating. If the temperature inside the incubator increase by 2*F over the optimum temperatures, immediately remove the lid and cool the eggs for 10 minutes to prevent overheating.
Here are a few tips to get better hatches from your Hova-Bator incubator with duck eggs.
Use two Hova-Bators – one for incubating the eggs and one for hatching the eggs.
The hatching is dirtier than the incubating so as long as very clean eggs are put in the incubator, the bacteria can be kept in check Since the hatching only lasts a few days – there are fewer bacteria in both incubators and this improves hatching rates.
Use a hydrometer to take the guesswork out of the humidity.
Hatching duck eggs requires a humidity level of 65% on average or 85* to 88*F on a wet-bulb thermometer. Older ducks lay more porous eggs and you will need to raise the humidity level slightly to accommodate the increase in evaporation. On the last 3 days of the incubation, the relative humidity should be increased to 75% or 92* to 94* on a wet-bulb thermometer. This is an estimate. Keep good records of each hatch and the relative humidity throughout the hatch. This will enable you to find the optimum humidity for your own ducks.
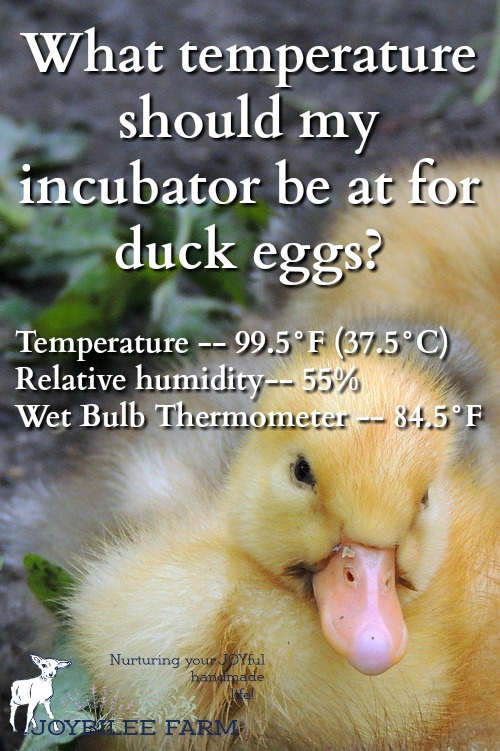
The forced air Hova-Bator should be operated at 99.25*F and 99.75*F for incubating duck eggs.
The temperature should be watched closely during the hatch and adjusted as necessary. As the incubation progresses, there is a temperature increase from the growing embryos in the last 7 to 10 days. Adjust the thermostat slightly each day to keep the eggs from overheating. When you move the eggs into the hatching incubator, the temperature should be maintained at 98*F for the final 2 days of the hatch. Use thermometers designed specifically for incubation as they are more accurate.
Candle the eggs at the end of week 1 and again at the end of week 3.
Unfertilized eggs and dead embryos will cause a bacterial bloom in the incubator, weakening the growing, live, embryos. It’s important to remove any dead embryos or unfertilized eggs that you find on candling.
Place the incubator on a sturdy table on an inside wall, away from direct sunlight or any heat source.
Incubators perform best inside buildings or rooms where the ambient temperature does not fluctuate more than 5*F over a 24 hour period. Consistent temperatures are especially important with smaller incubators, like the Hova-Bator. Try to locate your incubator away from heat sources and windows, in rooms with an ambient temperature of 65*F to 75* degrees. Never put the incubator in direct sunlight.
The incubator needs to be level to perform well. If the incubator is askew the air temperature in the incubator will be different at various spots in the incubator and the hatch rate will be adversely affected.
Allow for good air circulation around the incubator when hatching duck eggs
The developing duck embryos need a constant supply of fresh air, which is provided through the vent openings in the Hova-Bator. While incubating chicken eggs I keep these holes covered until the final 4 days of the hatch, when incubating duck eggs I keep these holes constantly open. In the final week, as you get closer to hatching, be sure that the Hova-Bator has all ventilation holes uncovered.
3 days before the expected hatch, remove the eggs from the incubating Hova-Bator and place them in the hatching incubator
In the hatcher relative humidity should be maintained at 85*. Some people find it helpful to lightly spritz the eggs with lukewarm tap water 48 hours and 24 hours before the calculated hatch time. If you only have one incubator, simply adjust the humidity in the final 2 days of the incubation period. Note the incubation period above that is specific to your duck breed.
Be sure the hatching incubator is lined with a washable tray.
This makes clean up easier and helps to minimize bacterial bloom before the hatch.
Do not open the lid of the incubator until the hatch is finished – super important.
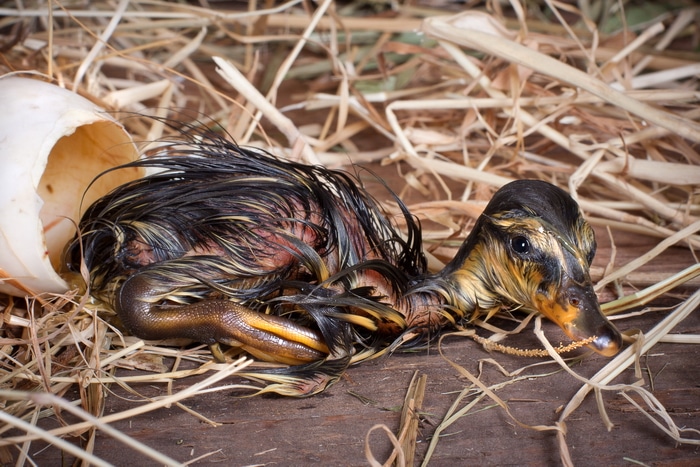
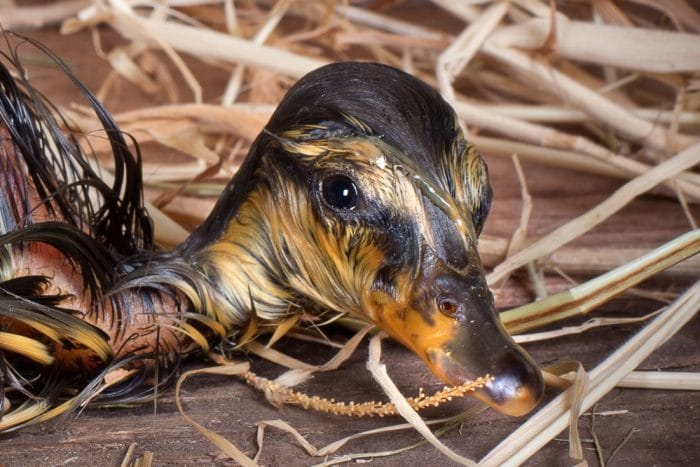
The glass window will fog up and condense once the hatch starts and you will want to see the progress of the hatch, but opening the window will allow the humidity to escape and the ducklings that have pipped will have their egg membranes dry and toughen, making it harder for them to break their tougher shells. It takes 24 to 48 hours for the ducklings to pip the eggs and then turns and work their way around the shell. Newly hatched ducklings will be tired and should be left in the incubator to dry out for 12 to 24 hours after hatching. Maintain good ventilation during this time.
After 48 hours open the incubator once and gently remove all ducklings. Replace the lid quickly. Allow another 24 hours to catch any stragglers.
Don’t be discouraged by low hatch rates.
With ducks, my average hatch is 50 to 70% so don’t be discouraged if your hatch is between 33% and 50%. Just set another hatch in the incubator when you remove the eggs from the hatcher. Keep good records of daily temperature and humidity readings, and make adjustments until you are happy with the hatch rate. If you are having poor hatch rates or chicks dying in the shell before pipping the most likely culprit is the humidity level. Ducklings are more sensitive to humidity levels than chicks. Keep good records and your hatch rates will improve over time.
Ways to improve the hatch rate when hatching duck eggs:
Ducks need higher nutrition than chickens – higher protein levels and higher B vitamin levels. If you can find certified organic duck brooder/breeder pellets, you’ll have the optimum quality feed for a good hatch. However, this specialty feed isn’t commonly available. Game bird brooder/breeder feed is also good for ducks.
Consider adding a crushed B-complex vitamin pill to their daily water pail to keep them strong. If you can’t find anything but organic chicken layer pellets to feed your ducks, add a bit of commercial dry cat food to the breeder diet about a month before you want hatching eggs. Cat food will add the extra needed protein. Any non-organic feed will contain GMO ingredients which may be harmful to your birds unless the ingredients are certified to be free of GMOs.
Keep the eggs clean. Put your breeding ducks in a clean, well-littered house, and don’t open the house until they lay in the morning. Clean eggs keep the incubator clean and give you a higher hatch rate.
As you are collecting the duck eggs for hatching, keep them at room temperature of 65* to 75*F and turn them once a day. I put mine in an egg carton, small side down, and support one end of the egg carton on a book. To turn the eggs, I change the end of the carton that is raised. Do not store eggs for hatching for any longer than 10 days before incubating them.
Ducks will lay from March or April till the end of June. Some breeds will lay for a whole season. The length of the lay depends on the breed and the weather. Don’t gather the first eggs but give it two weeks into the laying season and choose duck eggs from mid-April to the beginning of June. This is when the natural diet of the ducks is optimal for hatching. The early eggs are often weaker, as are the eggs in the later season.
While ducks will lay eggs without a drake, you need a drake in with the hens to get fertile eggs. One drake can service 3 to 6 ducks in the larger breeds, or one drake per 4 to 7 hens in the lighter breeds, so have an optimum ratio of drakes to hens. Too many drakes will spoil the hens and they won’t be able to lay well. Too few drakes and your eggs will be infertile.
Raising ducklings is a very satisfying way to build your homestead livestock. Ducklings will follow you and do not get as aggressive as chickens. Domestic male ducks do not generally act aggressively toward people. Ducks also do less damage to gardens than chickens, while egg-laying breeds, like runner ducks, can compete with chickens for their egg-laying abilities. Raising ducklings from eggs to breeding adults is the best way to ensure that your homestead livestock is the healthiest it can be.
References:
My go-to reference for this article and for all my homestead duck questions is
Dave Holderread’s book, Storey’s Guide to Raising Ducks, Breeds, Care, Health. If you are considering a duck project on your homestead, don’t wait to buy this book. (5 stars)

I do help them by gently cracking the egg around and then letting the baby push the egg apart. I know that’s not recommended but if the option is let the duckling die or give it a little help and see if it makes it, I choose to help. Often the problem is lack of humidity and that’s not the duckling’s fault. Momma duck would normally go for a swim to increase humidity on the eggs.
Hey I may be having same issue. One egg hatched. Yesterday. The other one has been trying since yesterday. Has a small hole but I don’t see it getting any further. What can I do??
I would probably help the pipped egg. What have you got to lose? The remove both ducklings.
This is my first official hatch attempt with ducks in a small incubator. On the last hand turn (5x/day) in the late PM on Day#24 my son noticed one of the eggs starting to pip. So, we readied the incubator for lockdown, immediately. The next morning we had our first hatch! Then, we noticed a second egg attempting to pip, but it stopped after circling around the center, and has not fully hatched, yet. However, the first duckling had been pecking at that egg all day, trying to help it out, or worse? Since everything I’ve read says lockdown means lockdown for a reason, I just had to pray and let nature run it’s course. I’ve also lowered the temp to 36.9’C from the previous 37.5’C, and I’m visualizing less active movement from the living duckling. However, previously x25 days the incubator was running higher at 39.2’C, because I had difficulty calibrating it at the very beginning. Any additional advice? And should I wait until we reach the 48th hour before removing the first hatched duckling, like most books say?
At times I’ve HAD to open the incubator during lockdown. When I do this, I move the incubator to the bathroom and run a hot, steamy shower. When I briefly open the incubator, I don’t lose the moisture inside because I have a hot, humid shower going. There are varying degrees of opinions on what I’m about to say, but I have done this before and I’m convinced I’ve saved more birds than I’ve harmed: if they pip (external) and don’t seem to be making progress after 48 hours I gently assist picking a little bit of the shell. I want them to have the energy to hatch and live, but they have to do it themselves. I say that because if you assist, you should only crack the shell along the pip-line. If you just pull a chunk of shell off you can actually really ruin its chances because they unzip and push their way out in a very specific way. I’d say only try this after several hatches where you know what you’re doing though.