Growing mushrooms in coffee grounds is a fun, and simple, project for anyone interested in the mysterious world of fungi. It’s a great starting point, using a medium that many households have in abundance. The mushrooms also turn the coffee grounds into a better soil amendment and compost than the coffee would be on it’s own.
Mushrooms are amazing. They grow off of cellulose based mediums, that animals and plants can’t use for food, and convert it into tasty, edible mushrooms. Further, they break down the cellulose and lignin in their growing medium, converting it into something plants, worms, and more can use.
You may have heard of growing oyster mushrooms on logs, or lion’s mane mushrooms on sawdust or logs. Shiitake is another frequent mushroom to grow, and a delicious addition to many meals. But, logs can be challenging to source, particularly in cities. Sawdust requires commitment, and a bit more technique. Coffee grounds, on the other hand, are free, easy to get, and easy to grow oyster mushrooms on. When growing mushrooms on coffee grounds, you can train other varieties like lion’s mane and shiitake to enjoy sawdust supplemented with coffee grounds, but the oysters adapt the quickest.

Coffee grounds are often added to compost bins, or directly to gardens, as a nutrition boost for plants. However, too much coffee grounds can add acidity to the soil, even though making coffee leaches out some of the naturally occurring acids and tannin. Too much coffee grounds in the compost bin can tip the balance of green and brown elements, making it harder for the compost to turn into plant food.
Growing Mushrooms on Coffee Grounds:
This is a no-input method for growing your oyster mushrooms on coffee grounds. You don’t have to buy anything extra, everything can come from your compost bucket, or be diverted from the compost before it gets there.
What you need:
- 1 large glass jar, like a peanut butter jar
- Stems from 1 hand of fresh blue or white oyster mushrooms
- 1 morning’s coffee grounds
What to do:
Wash the jar with dish soap and let air dry.
Trim the stems from your hand of oyster mushrooms. I recommend blue or white oysters, as they are hardier and more chill tolerant than the yellow or pink varieties. Do not use king oyster, pleuratus erengii, as they do not transfer to coffee grounds.
Cut stems in half to reveal the inner flesh, this is where the mushroom mycelium, roots, will come from.
Place stems in the jar, and add the fresh, but cool, coffee grounds. If using paper filters, leave the filters with the coffee grounds. The mushrooms can break down the filter paper. If using single serving style cups, take the top foil off and dump the coffee grounds from the cup into the jar. Do not add plastic to the jar.
Lightly shake down the jar so that the coffee is in full contact with the stems.
Place lid loosely on the jar, and set aside on the counter.
Each morning, after your morning coffee, add those additional coffee grounds to the jar. Do NOT shake the jar with each addition, wait three to four days instead.
After three or four days, you should see white, “mold” like mycelium creeping along the bottom of the jar from the stems. At this time, if there’s a lot of blank coffee on the top of the mycelial area, you can shake the jar to spread out the contact points and speed up the mycelial growth.
Continue adding fresh coffee and monitoring the white growth until the jar is full to the brim. Let the mycelium grow across the top of the jar, until it is completely covered. Around this point, you can take 1/4 cup of the mycelium rich coffee grounds and move them to a new jar. Split one or two day’s coffee grounds between the jars, so you can completely fill the first one, and get started on a second one. Technically you can perpetuate growing mushrooms in coffee grounds as long as you’d like.

Mycelation left to right, 1/3rd mycelated, 1/2 mycelated, and fully mycelated
To Fruit:
Take your fully mycelated jar of coffee grounds, if using blue or white oyster mushrooms, and place in the fridge for 12-24 hours. This is a cold shock. Yellow and pink oyster mushrooms do not need a cold shock, but will need a slight temperature decrease to fruit well.
Then, bring it out and place it under a plastic bag with holes punched through it. Oyster mushrooms like lots of air flow, and the holes in the bag will help keep fresh air near the mushrooms while also keeping humidity levels decent. Add a small desk humidifier under the bag, if your home is dry. Or use a small, clean, essential oil diffuser with just water added.
Pins should begin forming within 2-5 days. Keep the humidity up until the oyster mushrooms generate caps and the edges start trying to turn up. This can take an additional 3-7 days. If the caps start drying at the edges, or the gills start releasing spores, harvest right away.
Oyster mushrooms have a heavy spore load, and it’s preferable to harvest them before spores release. This helps the mushroom last longer in the fridge, and keeps your health, house, and lungs safe from the spores.

Growing Mushrooms in Coffee Grounds: The Box
Once you have a jar or two of well mycellated coffee grounds, the simplest way to get a harvest is to use “the box.”
Basically, get a few ice cream pails of coffee grounds from your local coffee shop. Make sure they are fresh, and don’t have visible mold if possible.
Pour one pail of coffee grounds into a plain cardboard box. Add one jar of your prepared mycellated coffee grounds and mix in. If there’s space, add another bucket and your other jar of coffee ground mushroom spawn. Mix up well.
Add even more grounds if your box is big enough, and place out of the way under a friendly bush, tree, or in a shady corner of the garden where it will get hit with the watering spray. Wait about 6 weeks, and cover the top of the box with a layer of leaves.
The oyster mushrooms will grow through the leaves, usually at the top and very bottom of the cardboard box. A box based oyster mushroom grow will fruit 3-6 times in a single fall, and can even continue fruiting when it’s cold enough to freeze the mushrooms as they’re growing out of the box!
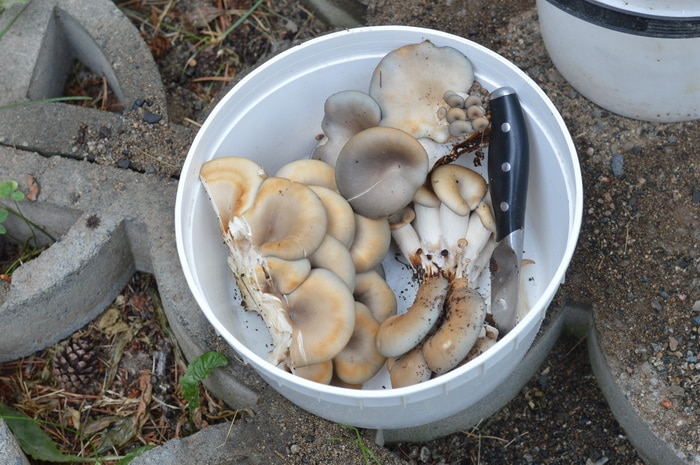
Our mushroom box of blue oyster mushrooms fruited between 3 and 5 pounds of fresh mushrooms per flush. That’s with minimal maintenence and pretty much letting nature, mushrooms, and coffee grounds take their course.
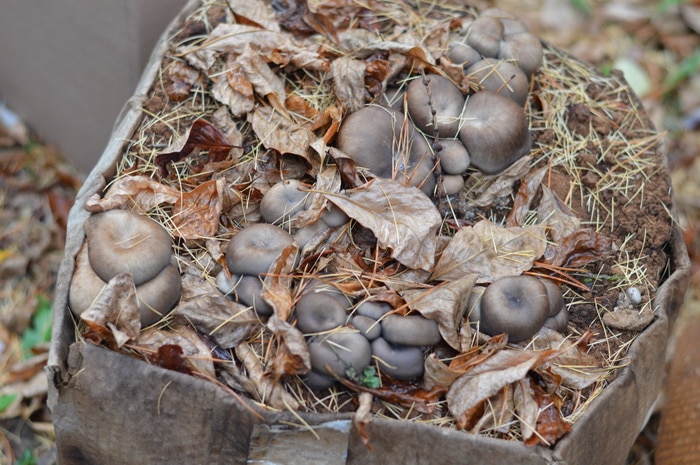
If you want to expand a box grow, wait until it fruits the first time. Then, get more coffee grounds and a fresh box, and split the existing box in half and mix in the new coffee grounds to both boxes. If you wait until these boxes fruit, you can then expand them again, as many times as you’d like. As long as the boxed coffee and mycelium keep producing fruits before you split the boxes, you know your mushrooms are strong enough. If there is a long delay in fruiting, without a corresponding weather reason like heat, or winter, then you may want to re-start your initial coffee spawn with a fresh mushroom piece, and just let the existing boxes fruit as they wish until they’re broken down enough to add to the compost, heugulkulture bed, or garden path.
Growing Mushrooms in Coffee Grounds: Advanced
The first technique is simple, and great to do on a kitchen counter or with kids as a science experiment. If you want to grow more than a handful of mushrooms, however, there are more advanced techniques to use. This method requires a bit more investment in equipment and items, but can still work well in a small home space.
What you need:
- filter patch bags, 0.5 micron, also known as grow bags
- oyster mushroom spawn, either sawdust or grain spawn
- spent coffee grounds
- sawdust pellets (hardwood fuel pellets)
- A pressure cooker or canner
- A space will no drafts than can be cleaned and sanitized
- A dark space, away from direct sunlight
- A lighter space, that is moisture protected with some fresh air and humidity adding ability

What to Do:
Start with preparing the substrate. Most spawn blocks will easily inoculate 8 bags of new substrate, a grain spawn bag can do 10. Figure out how many bags you want to do, and grab a large, clean, Rubbermaid tub for mixing and measuring.
Hydrate 3 cups of hardwood sawdust pellets per bag of mushrooms you want to grow. If you’re doing 6 bags, that’ll be 18 cups of pellets. Add 1.5 liters of water per bag as well, to the pellets. Use warm or hot water for faster hydrating.
Add 1-2 cups of used coffee grounds per bag as well. So for 6 bags, that would be 9 cups of coffee waste.
Divide the substrate mixture up into the filter patch bags. The bags should weigh between 4 and 5 pounds.
Fold down the top of the bags, and place in your pressure canner. You will want to sterilize the bags to prevent contamination from the coffee grounds, or from bacteria. Place spacers on the bottom of the canner, if your canner came with a spacer, use it. I like placing a layer of canning jar rings, the spacing rack upside down on them, and then the bottom perforated disk.
Add just enough water to touch the bottom of the bags. In my 18 quart canner, that is about 3.5 quarts of water.
I save the secondary perforated disk for placing on top of the bags with a weight to prevent the bags from getting loose and blocking the steam release.

Secure the lid of the canner, and follow canner specific directions to bring it up to begin pressurizing. I like pressurizing to 15lbs, for 2.5 hours for sterilizing substrate/growing medium.
Let the canner depressurize and cool naturally. To prevent potential contamination, cover the venting ports with a cloth soaked in either isopropyl alcohol, or hydrogen peroxide during the cool down phase.
Once the canner is cooled completely, up to 12 hours from finishing the sterilization run, open it carefully in a room with still air. Avoid having fans or heaters on, and avoid having windows open. Remove the bags of substrate, and place on a clean and sanitized counter or table.
One bag at a time, open the top and pour in your sawdust or grain spawn. If using sawdust spawn crumble it up finely before adding it to your sawdust and coffee ground, sterilized, substrate bag. Seal the bag using an impulse sealer, if available. If a sealer is not available, tape down the top edge of the bag with packing tape. Shake the bag up to mix the spawn into the substrate.
Label and date the bag, for your records.
Place inoculated bags into a dark place or other relatively still space. The space can have ambient temperatures up to 70 degrees, but it is not recommended to run mycelation warmer than that as the mycelation process creates heat as well. Excess heat during mycelation can also increase contamination chance.
Wait 1-2 weeks, checking bags every 2-3 days for signs of pink or green contamination.
After about 2 weeks, oyster mushrooms are normally fully mycelated and ready for fruiting. If working with cold tolerant strains of oyster mushroom, cold shock the bags either in a colder room, safe outdoor area, or the fridge for 12-24 hours. Heat loving oyster strains do NOT need a cold shock, cold can kill them.
After the shock, transfer the bags to your fruiting area. A fruiting area should have airflow, humidity levels around 85-90%, and be around 65 degrees F for cold strains. Temps of up to 85F are great for heat loving strains.
Growing Mushrooms in Coffee Grounds Troubleshooting:
When growing mushrooms with larger amounts of coffee grounds, molds can sometimes show up. The most frequent contaminator with coffee grounds is trichoderma mold, one that gives off bright greenish spores. If that shows up, it either indicates the bag wasn’t sterilized long enough, or that here was an error between sterilization and inoculation. This error could be as simple as not checking the orange bowl before doing the inoculations and accidentally having a moldy orange inside the house.
When contamination happens, revisit the procedure and day and check all other bags done the same day. Then check to see if something was missed in the sterile process.
When working with small amounts of fresh coffee there is usually very little chance of contamination. This is because the brewing process pasteurizes the grounds, and the oyster mushroom mycelia is active enough to take over the coffee before another spore has time to take hold.
I like using method one of this post for small amounts, or to expand spawn in an experimental environment. And method two is great if you need larger amounts of mushrooms, or want to do it at a small scale commercial level.
A second trouble shooting problem can be small or malformed oyster clusters. This is often due to the humidity and C02 levels in the fruiting area. More fresh air will reduce stem size, and help increase cap size. Small clusters can also be a symptom of low nutrients in your substrate, or just a small container. Coffee is high in nitrogen, so it’s good for boosting the nutrition of straw or sawdust pellets for larger clusters.
Other Oyster Mushroom Considerations
The easiest way to try new strains of oyster mushrooms, or any variety of gourmet mushrooms really, is through the use of kits. These give you a chance to run a first flush, and then, with oyster specifically, run new substrate from the old kit.
Coffee shops are a great source of spent coffee grounds. I would ask for that day’s grounds specifically, as they’ll have a lower chance of carrying pre-existing contamination spores then. Fresh coffee grounds will always work better than aged ones, due to the potential presence of mold or other fungi spores in the older grounds. My favorite source of coffee grounds is a local coffee shop who gives me a couple gallon buckets a week, or as I need them.
Mushroom cultivation is a fun hobby, and can be expanded to providing mushrooms to friends, family, or as a business. Some mushrooms grow well in indirect sunlight, or with natural ambient light. Many mushrooms are phototropic and will grow toward a light source, oysters included.
Even one small success at growing mushrooms can make you feel like a full blown mushroom farmer. Oyster mushrooms are great for beginners, and you can even grow them on hot-water-soaked cardboard, layered cardboard and coffee grounds, straw, paper, newspaper, and even clothing and textile wastes. They are an amazingly diverse and adaptable edible mushroom.
Learn more about growing mushrooms in the garden
Sarah’s new book, Growing Mushrooms for Beginners, A Simple Guide to Cultivating Mushrooms at Home, is available on Amazon and Barnes and Noble. In this concise resource Sarah guides you step by step through growing mushrooms on logs, on straw, on wood chips in the garden, or even in Mason jars in your kitchen. The book includes instructions for growing seven mushrooms including shiitake, oyster, lions mane, garden giant/wine cap, and more. Learn the unique characteristics, flavors, health benefits, and specific growing requirements for each mushroom as well as space saving tips and recipes to get the most out of your mushroom harvest.
Get your copy of Growing Mushrooms for Beginners now.





If you are growing in the open in a cardboard box, I think you could just pour boiling water over the grounds. Oyster mushrooms are very aggressive. But it is risky, so if you have a lot of money invested, I’d start with fresh grounds from a local coffee shop. If you are transferring from another medium and can handle the risk, then go with what you have now and see what happens.
Hey thanks for the info, I’m wondering if you have any insight into
pasturizing coffee grounds that are a bit older? I’ve heard a pressure cooker can work, just not sure how long and temperature etc.
also could I not just re-soak the grounds in boiling water?
thanks again
Thanks so much again…
Depending on the temperature it can take a couple weeks before you see the beginning of the white mycelium threads in the coffee. If you haven’t seen anything in a month, the mycelium might have been killed by heat or sterilization.
hi…nothing is happening in my jar…how long should I wait…I started the process on 10/22…
Thanks so much for all the good info!
Lynn