Ingredients
Scale
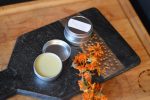
- 4 tbsp. calendula infused olive oil*
- 2 tbsp. shea butter
- 1 tsp. carnauba wax
- 2 tbsp. beeswax
- ¼ tsp. vitamin E
- 30 drops rosemary essential oil (optional)
- 15 drops lavender essential oil (optional)
Instructions
- Make a double boiler using a glass measuring cup and a saucepan. Fill the saucepan with water so it comes halfway up the side of the measuring cup.
- Place calendula infused olive oil, shea butter, carnauba wax, and beeswax into the measuring cup. Simmer the saucepan over medium heat until all the ingredients are melted.
- Remove the measuring cup from the saucepan. Stir in vitamin E, rosemary, and lavender essential oils.
- Pour into 3 – 2 oz. tins. Allow to cool completely before capping, to prevent condensation from forming on the inside of the lids.
- Label the tins and date. This paw wax will last a year without spoilage. If you notice any signs of spoilage, such as mold or an off-smell, discard and make a fresh batch.
Notes
- Apply to your dog’s paws before going outside, at least once a day. Be sure to rub it between the toe pads to prevent ice build-up. If the dog has cracked or broken skin, apply twice a day to encourage rapid healing.
- The wax dries quickly on the paws and created a protective barrier against injury.