Description
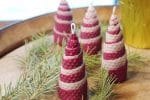
These small conical candles resemble a Chrismas tree. Use them for gift toppers, tree ornaments, party favors, or table settings for your winter holiday decorations.
Ingredients
Scale
Instructions
- Work with 2 beeswax sheets together one on top of the other.
- Lay the 2 beeswax sheets on the table, one on top of the other, so that the long side extends from left to right. Measure 4 1/4 inches along the 8 1/2 inch side of the beeswax sheets. Score the sheets at this point, dividing the both sheets in half. Use the craft knife or scissors to cut the sheets in half. You’ll have 4 pieces of beeswax measuring 4 1/4 inches by 16 inches — 2 pieces of each color.
- Working with half the beeswax sheets at a time, place the rectangle on the table in front of you with the long side extending from left to right on the table. Place the contrasting color of beeswax on top of the first rectangle. You’ll work with the two rectangles stacked one on top of the other.
- Using the craft knife, score a diagonal line from half an inch up from the bottom of the rectangle, beginning at the left side, to half an inch down from the top of the rectangle on the right side. Separate at the score mark. You’ll have four “triangles” — 2 of each color. Repeat with the other rectangle. You now have eight right-angle triangles that are 3 1/2 inches on the shortest side.– four of each color.
- Find the top of your wick by looking for the V along the braid. Cut the wick into 5-inch pieces if you are making candles to burn. If you are making ornaments for gift toppers or to hand on a Christmas tree, make the wicks 6 inches long.
- Lay your first triangle on the table in front of you with the point of the triangle pointing away from you and the 3-inch edge closest to you. Place the contrasting color triangle on top of this triangle, with the long edge about 1/4 inch up from the edge. Place the right angle of the triangle on your left side.
- Place the wick along the short edge of the triangle with the bottom of the wick flush with the right angle corner. The top of the wick will overhang the wax by 1/2 inch. If you are making this as a gift topper or ornament, loop the wick and place the cut edge inside the wax to secure it.
- Warm the wax with the hairdryer until it just begins to glisten. Do not overheat. Using the edge of a ruler, turn up the short edge of the wax and fold it over the wick. Roll the candle tightly, keeping the bottom even and letting the sides of the candle flare out slightly. Secure the edge by warming the wax with your hand and pressing firmly.
- Repeat with the three remaining Christmas tree shapes, using two colors of wax for each tree.
Notes
TIP: Add glitter to decorate the tree shapes. To do so, warm the trees with a hairdryer. Sprinkle a small amount of glitter on a paper towel (use polyester glitter rather than aluminum glitter if the candles will be lit). Roll the warmed wax in the glitter to evenly distribute on the wax. Shake off excess glitter. Allow the trees to harden.